If you’ve ever looked at your GA4 reports and surprisingly found your own website showing up as a top referral source, you’re not alone! Fortunately, it’s a pretty easy thing to fix. By default, when someone goes from one of your domains to another, GA4 loses track of their identity, starts a completely new session, and records your own site as the traffic source.
Cross-domain tracking is the solution. When it’s set up properly, GA4 views the entire user journey as one session, no matter how many of your domains they visit. This is particularly useful if you have a website for marketing and a separate one for e-commerce, if you use a third-party provider to handle payments, or if you manage a network of related websites.
Why does GA4 lose track of users across domains?
GA4 first identifies people using first-party cookies, which assign each person and each session a unique ID. Without cross-domain tracking, each website a person visits creates a new cookie with a new ID. As a result, someone on the same device visiting different websites of yours is counted as two people and two visits instead of one.
This is because of a browser security feature regarding cookies – it isn’t something GA4 is doing incorrectly. When a user clicks from your marketing site to the checkout domain, GA4 has no way of knowing it’s the same person. Your site then appears to be sending you visitors. This “self-referral” makes your visitor numbers higher than they are, distorts session metrics, and, most importantly, breaks your key event (conversion) attribution.
Are subdomains affected too?
No, subdomains don’t need a cross-domain tracking setup. GA4 considers subdomains to be part of the same website if they’re in the same GA4 property. The cookie is created on the main website address and is available to all of its subdomains.
Just remember, you only need cross-domain tracking when people are moving between completely separate root domains.
How does cross-domain tracking work?
It’s fairly straightforward. When a person clicks a link from Domain A to Domain B, GA4 adds a small bit of code (_gl) to the end of the URL. This “_gl” parameter contains a secure code representing the user’s key identifiers (client ID and session ID). Domain B reads this and realizes it’s the same person, instead of starting a new session.
You don’t need to add anything to the destination page to get this to work, since GA4 automatically gets the information from the URL. Because of cross-domain tracking, the user keeps the same ID and session as they move between sites.
However, it’s worth being aware of one thing: if you’re using GA4’s Enhanced Measurement and someone clicks a link that would normally trigger an event, that event won’t fire if the link goes to one of the sites you’ve included in cross-domain tracking. And that’s done deliberately by GA4 to prevent the reports from getting cluttered.
What you need before you start
Before going any further, you’ll need:
- Editor-level access or above to your GA4 property.
- The same Measurement ID on all domains: if each site is sending data to a different GA4 property, cross-domain tracking won’t work.
- Standard HTML links between your domains: cross-domain tracking only happens when people click a regular hyperlink (not a button, a form submission, or a JavaScript redirect).
Setting up cross-domain tracking: step-by-step
Here’s what to do in your GA4 interface:
-
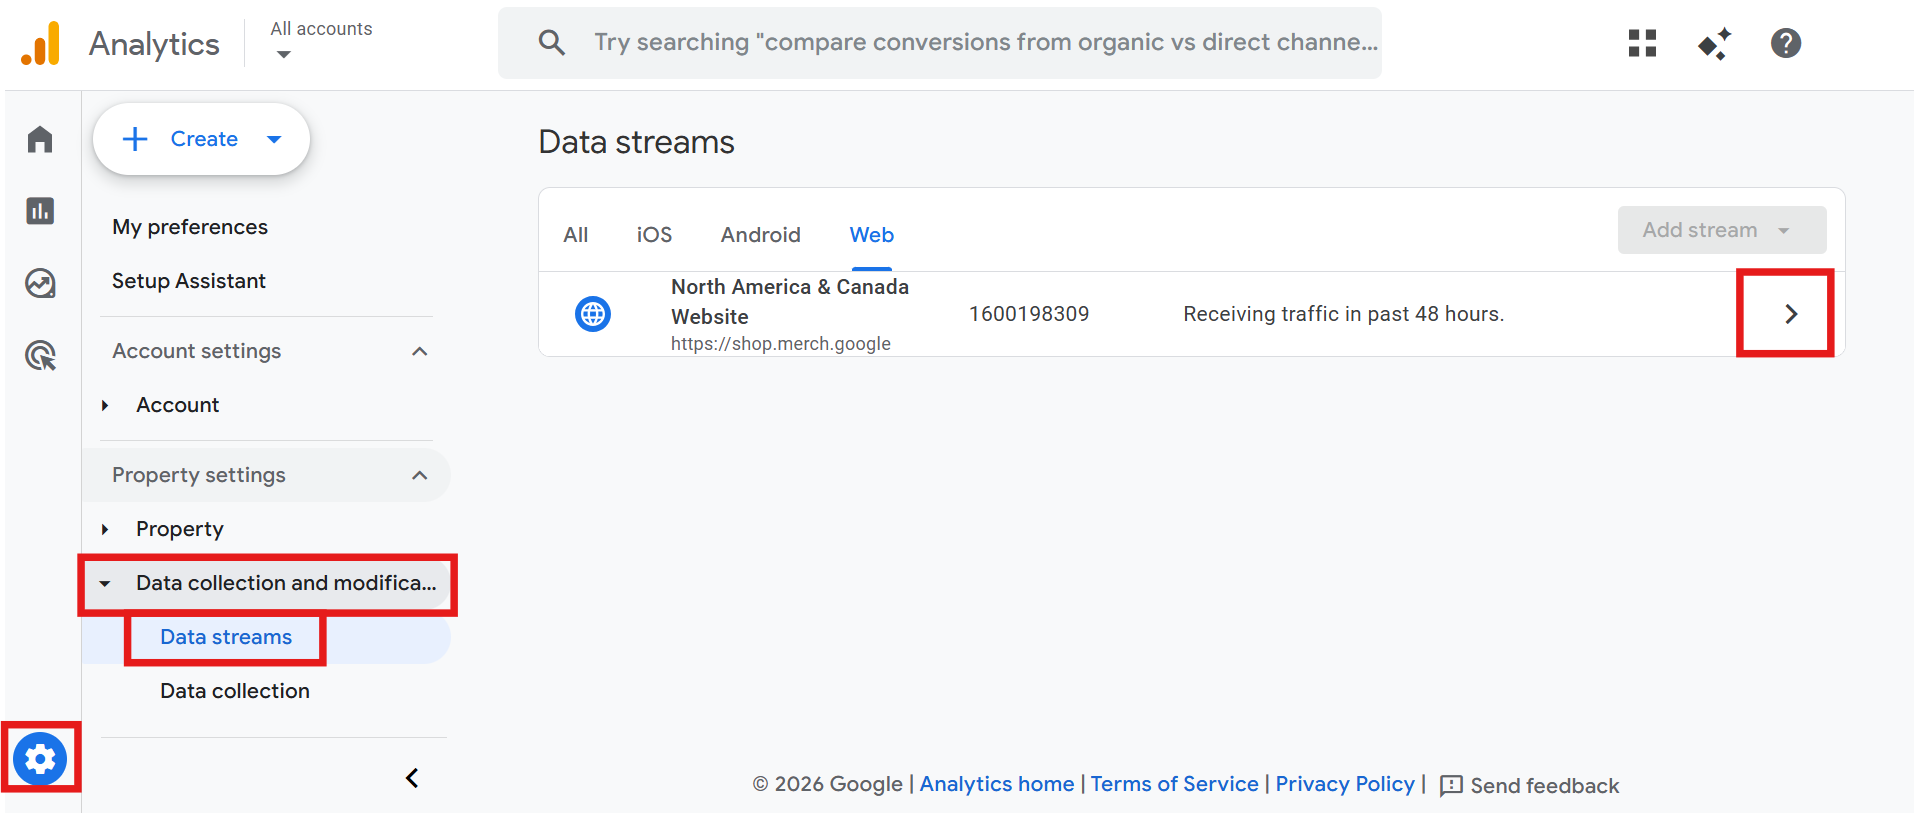
Go to Admin > Data collection and modification > Data streams > select your web data stream.
-
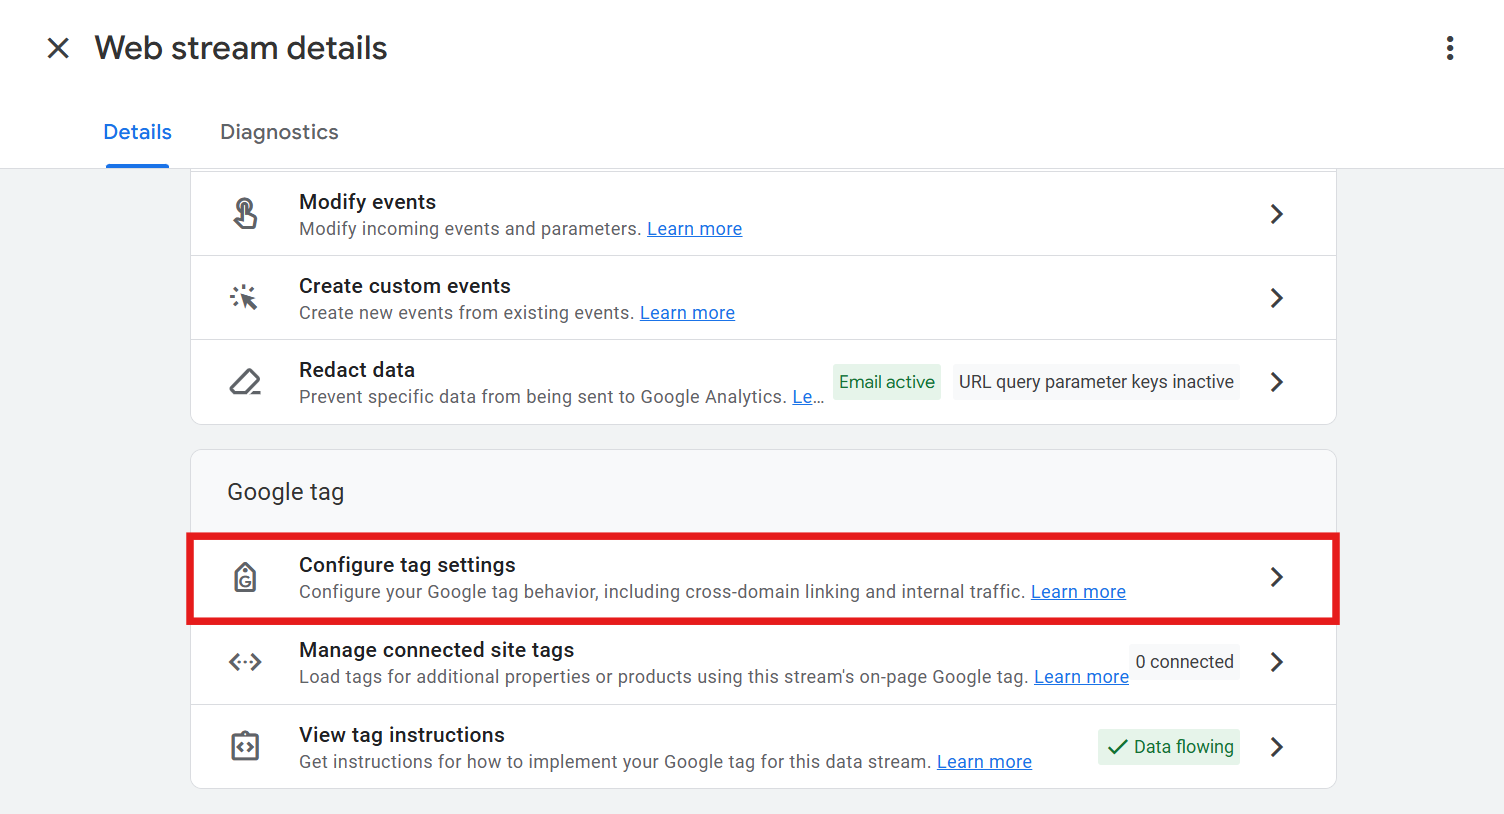
Scroll down to the Google Tag section and click Configure tag settings.
-
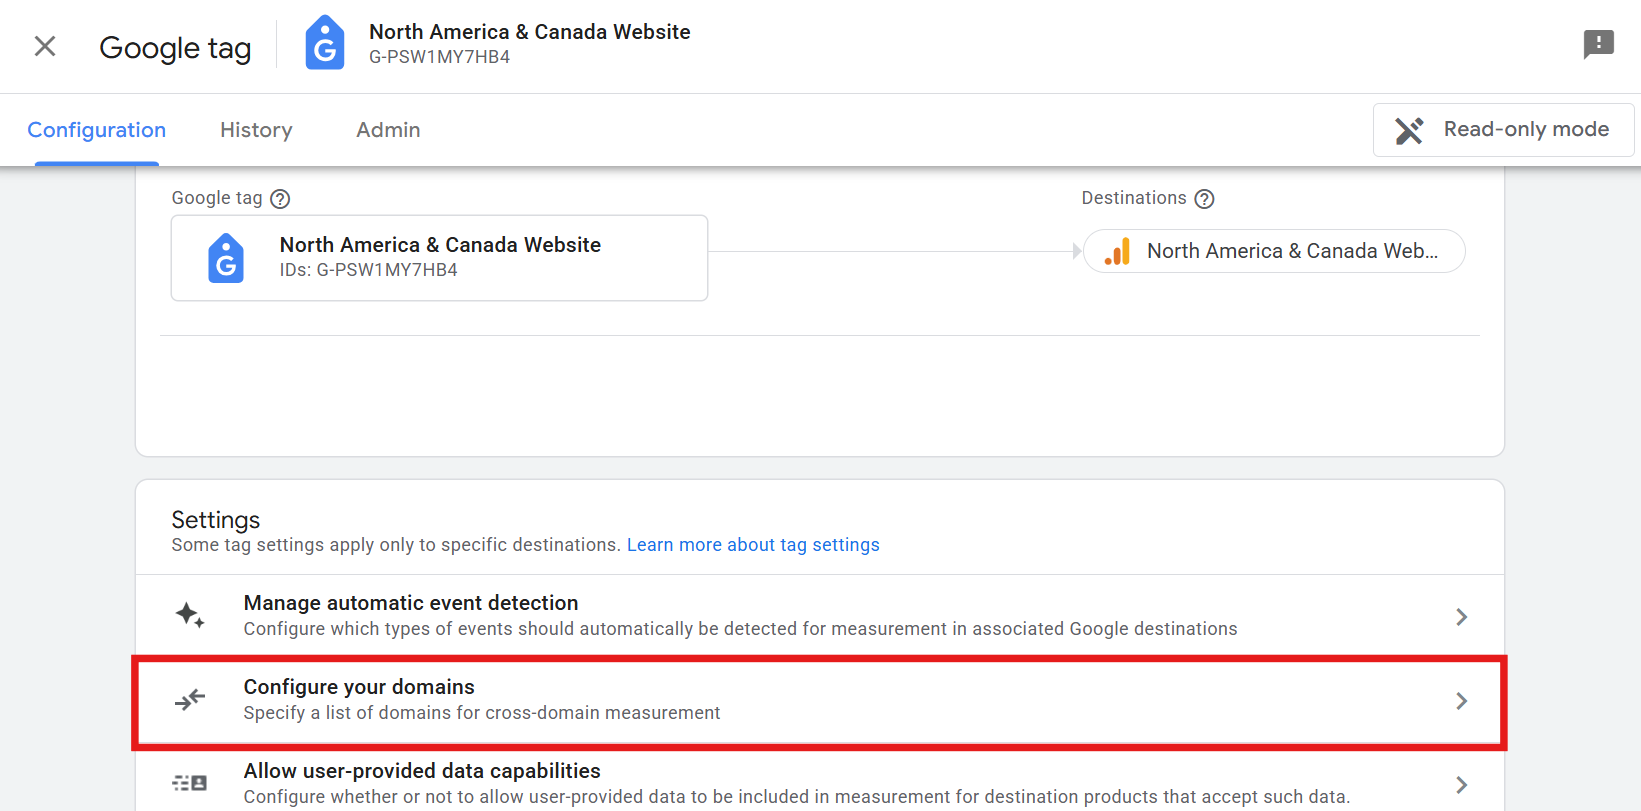
Under Settings, click Configure your domains.
-
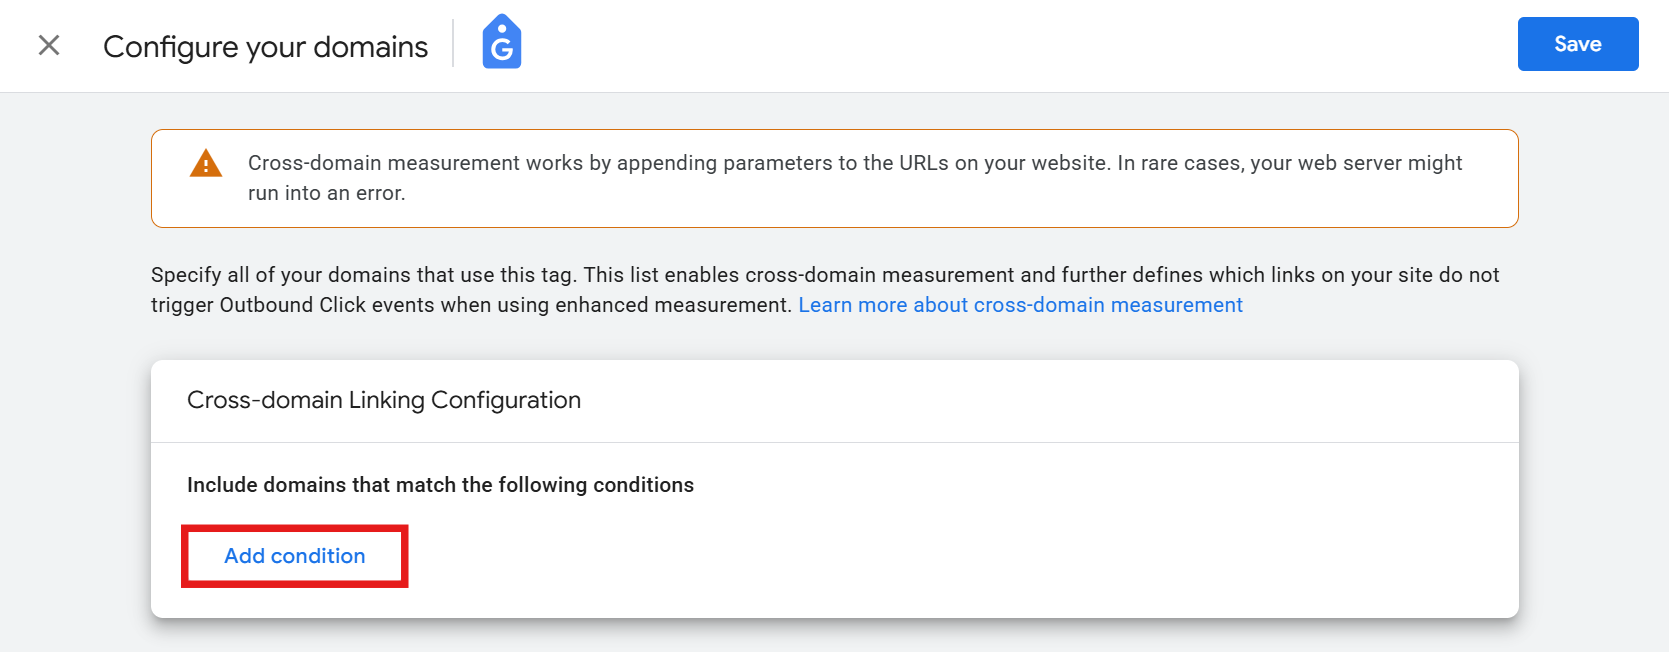
Click Add condition.
-
“Contains” works well for most setups. Enter your root domain (no https:// needed) and repeat for each additional domain you want to include. When you’re done, click Save.
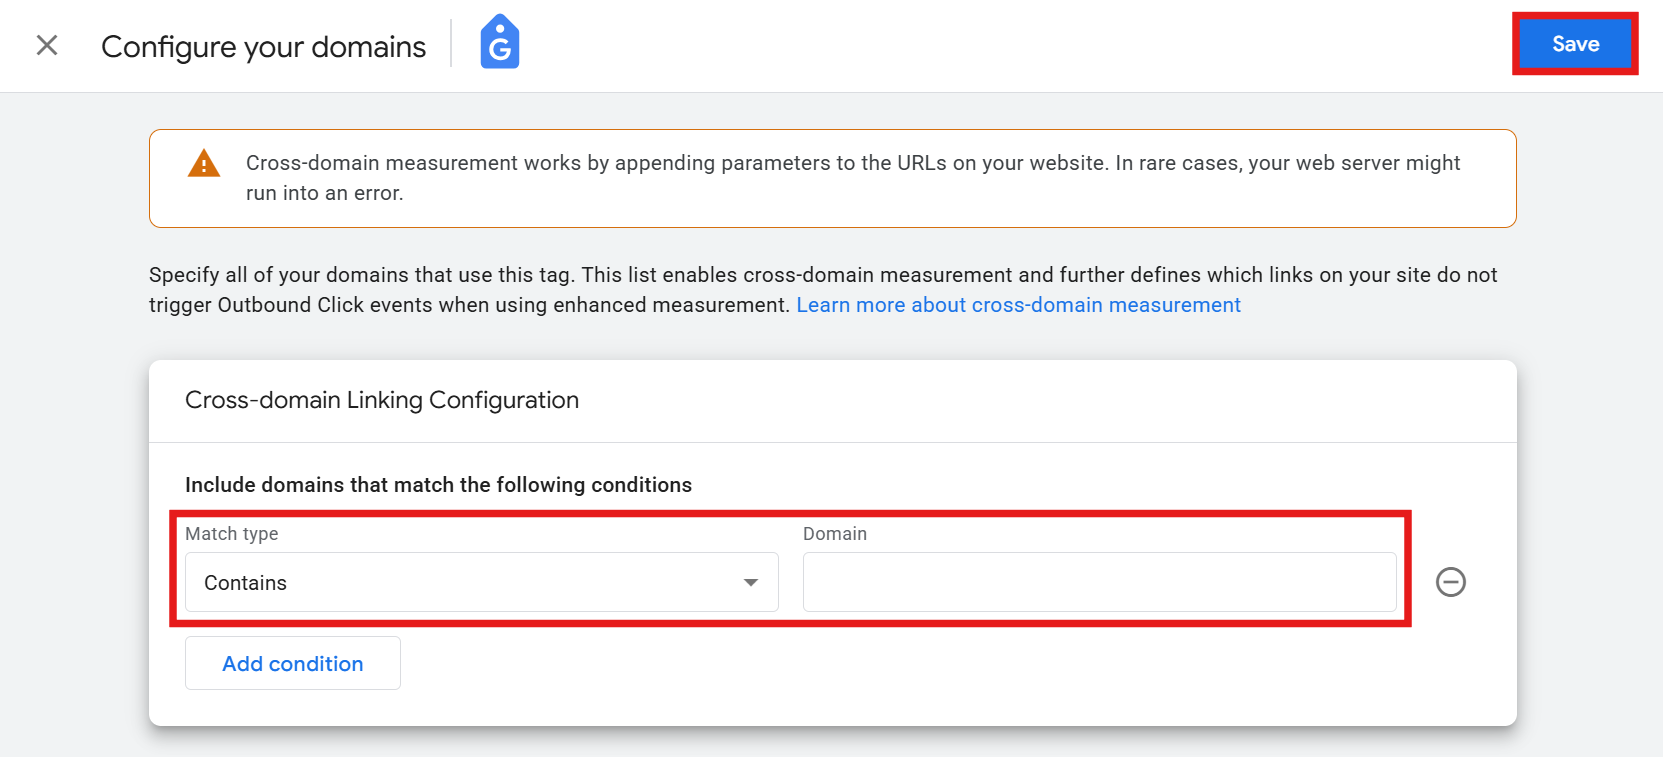
GA4 automatically excludes your own domains from referral sources, and will do so for any domain you set up in this section. However, if you’ve set things up and your domains are still appearing as referrals after 48 hours, you can manually add them to the unwanted referrals list as a last resort.
Pro tip: if you already use the same Google tag for all your domains, GA4 may have auto-detected them and listed them under a “Recommendations” section. In that case, you can click Add instead of manually typing them in.
Using Google Tag Manager? A couple of extra steps
If you’re deploying your Google tag through Google Tag Manager (GTM), you’ll be pleased to hear that the GA4 steps you’ve already completed are all you need to get tracking across multiple domains working. That said, do check a couple of things in GTM before you finish.
-
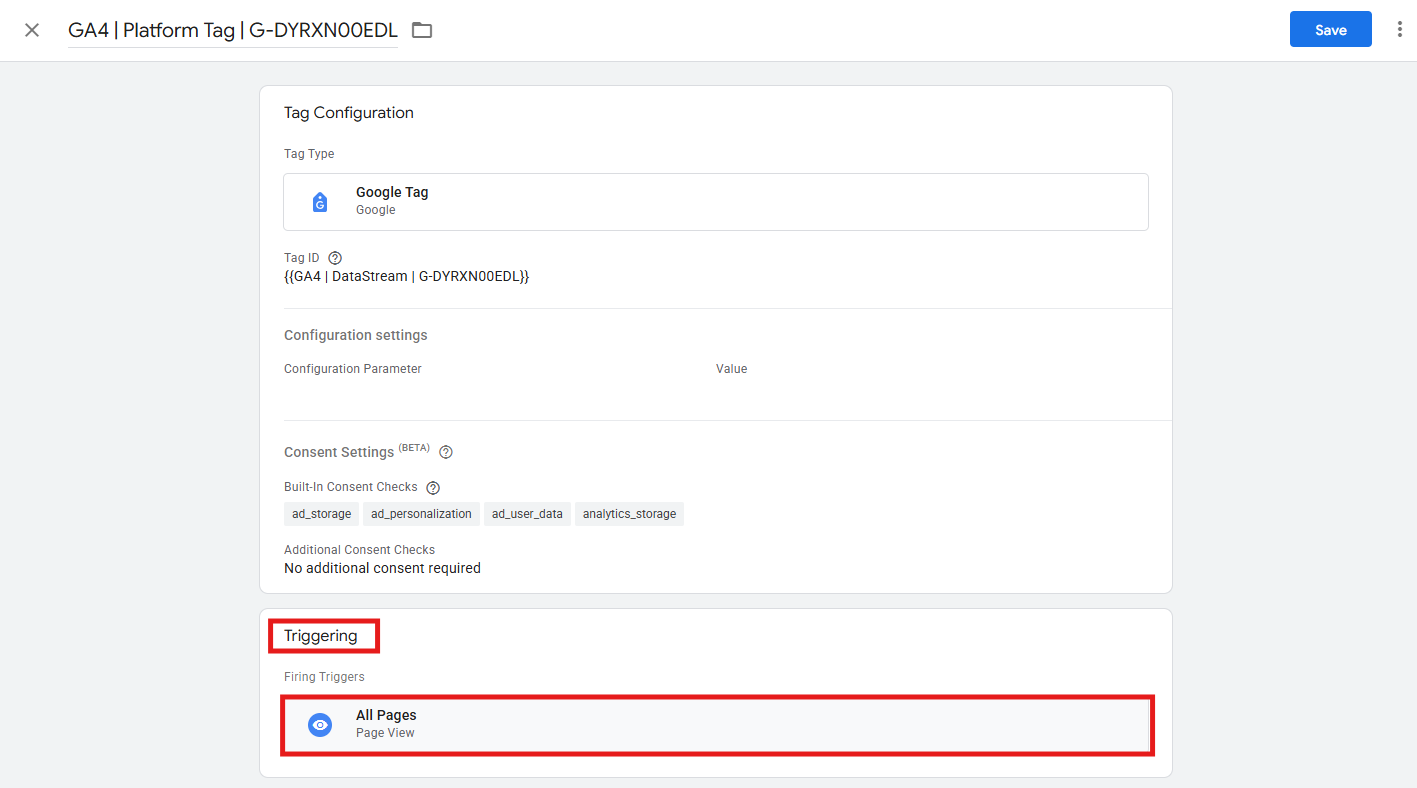
Go to Tags > open the Google tag that’s firing across your domains > Triggering section > confirm that the trigger is set to All Pages. If any of your domains have a different tag or a restricted trigger, cross-domain tracking won’t work on those pages.
-
Back in GTM’s workspace, use the Preview mode before publishing any changes (if there were any). Navigate between your domains inside the preview session and confirm that the “_gl” parameter appears in the destination URL.

-
Once confirmed, publish your container by clicking Submit.

Verify cross-domain tracking is working
Don’t skip this step. If cross-domain tracking isn’t set up properly, you won’t realize there’s a problem until your data is wrong. You have a few options to test this:
-
The quickest test
Go to your first domain, click a link to your second domain, and check the URL in the address bar. You should see a long query parameter starting with ”?_gl=” added to the end of the URL. If it’s there, the basic linking is working.
-
DebugView: a more rigorous test
Use GA4’s DebugView report alongside the GA Debugger Chrome extension. Go from Domain A to Domain B and watch the events in DebugView. The ga_session_id should be the same on both domains. If the session ID changes when you move between domains, the linking isn’t working as it should.
-
“_ga” cookie check
You can also open your browser’s developer tools (F12 > Application > Cookies) and compare the value of the “_ga” cookie across both domains. If cross-domain tracking is working correctly, the value should be identical on both.
What cross-domain tracking doesn’t solve
There are things this setup can’t fix. Specifically:
- Users who haven’t given consent and are using Consent Mode won’t have their sessions linked across domains. This is particularly relevant for businesses with users across regions with different consent rules.
- It doesn’t work for JavaScript-triggered navigation or
<button>clicks. - It doesn’t persist across different GA4 properties (both domains must use the same Measurement ID).
- It depends on the “_gl” parameter surviving redirects, and this doesn’t always happen.
- Ad blockers and privacy-focused browsers can remove the parameter before it is read.
For scenarios that fall outside these limits, a developer will need to build a custom solution to manually send the client ID and session ID between the domains.
Tip: get to know the top 10 Google Consent Mode mistakes and ways to fix them in this article.
Common problems and how to fix them
| Issue | Cause | Fix |
|---|---|---|
| The “_gl” parameter disappears | A redirect on the destination page is stripping the parameter before it loads. | Use Chrome Developer Tools to check network requests and confirm a redirect is the cause. Then ask a developer to configure the site to preserve “_gl” through redirects. |
| Domains are not configured consistently | The domain list in GA4 Admin and the one in your GTM tag don’t match, so sessions can’t stitch correctly. | Cross-check both lists and make sure they’re identical (same root domains only, no subdomains). |
| JavaScript-triggered navigation | GA4’s event listener works by detecting link clicks that surface to the document node. <button> elements, JavaScript redirects, and most form submissions bypass this process entirely, so the “_gl” parameter never gets appended. | For button- or form-based cross-domain journeys, a custom solution is needed to manually pass the client ID and session ID between domains. |
| Ad blockers and privacy tools | Tools like Brave Browser can strip URL parameters, including “_gl,” before the destination page reads it. | There is no clean fix. This is an inherent limitation of client-side cookie-based tracking. |
| Conflicting scripts | Third-party scripts can block the click event from reaching GA4’s listener, preventing the “_gl” parameter from being added. | Use browser developer tools to selectively disable scripts and identify the cause, then work with a developer to resolve the conflict. |
Final thoughts
Implementing cross-domain tracking in GA4 is something you can easily forget when setting things up, but it really improves the quality of your data. It’s the only method for getting a complete picture of what a user does from the first time they visit, to when they actually convert, across all of your domains.
As we’ve discussed, it only takes a few minutes to do. Because it will greatly improve the accuracy of your reports, you should set it up now.