Lots of people using GTM get to the point where they look at the choice of variable types and aren’t really sure which one to select. Is it a Data Layer Variable, a JavaScript Variable, or Custom JavaScript? They’re all a little alike, and the differences aren’t always obvious. And because the incorrect choice often almost works, it doesn’t cause an immediate error. You only discover the problem when you’re trying to solve something else, perhaps months later.
Well, that’s not going to happen anymore. This guide will examine each GTM variable type, describe what it actually does, and advise you on when to use it.
Built-in vs. user-defined variables
Firstly, it’s helpful to understand this division:
1) Built-in variables are already set up in every GTM account. They serve common scenarios, such as page URLs, click details, form fields, how far down the page someone has scrolled, and so on. You turn these on when you need them rather than building them from scratch. Here’s a handy list of the groups of built-in variables and when you’d generally activate them:
| Group | Examples | When to enable |
|---|---|---|
| Clicks | Click Element, Click Classes, Click ID, Click URL, Click Text | Tracking link or button interactions |
| Errors | Error Message, Error URL, Error Line, Debug Mode | Debugging JavaScript errors on the page |
| Forms | Form Element, Form ID, Form Classes, Form Text, Form URL | Tracking form submissions |
| History | History Source, New History Fragment, New History State | Tracking single-page app navigation |
| Pages | Page URL, Page Path, Page Hostname, Referrer | Almost always (core to most setups) |
| Scroll | Scroll Depth Threshold, Scroll Depth Units, Scroll Direction | Measuring content engagement |
| Utilities | Container ID, Container Version, Event, Random Number | Container management and debugging |
| Videos | Video Title, Video URL, Video Status, Video Percent, Video Duration | YouTube embed tracking |
| Visibility | Percent Visible, On-Screen Duration | Element visibility tracking |
How to enable built-in variables:
-
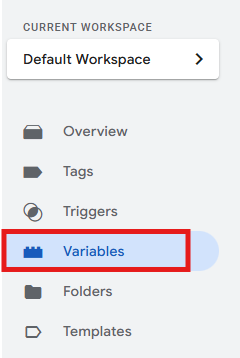
In your GTM workspace, go to Variables in the left-hand menu.
-
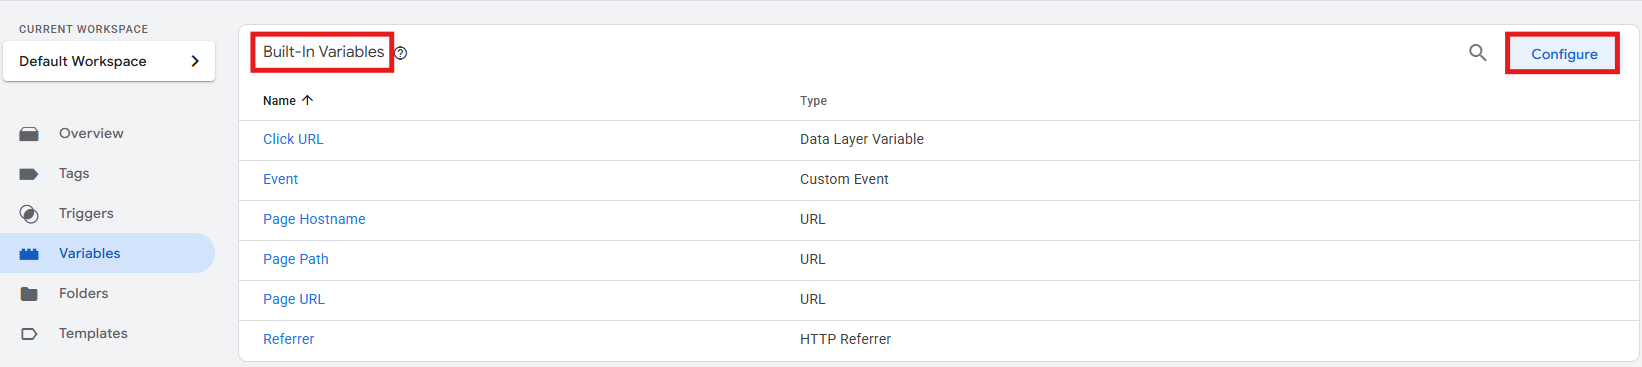
Click Configure in the Built-in Variables section. You can then select the ones you wish to use and toggle off the ones you don’t.
2) User-defined variables are the ones you create yourself – and so the focus of this article. Knowing which types to create, why, and when to use them is what keeps your container clean and maintainable over time.
How to create a user-defined variable:
-
Go to Variables in your GTM workspace.
-
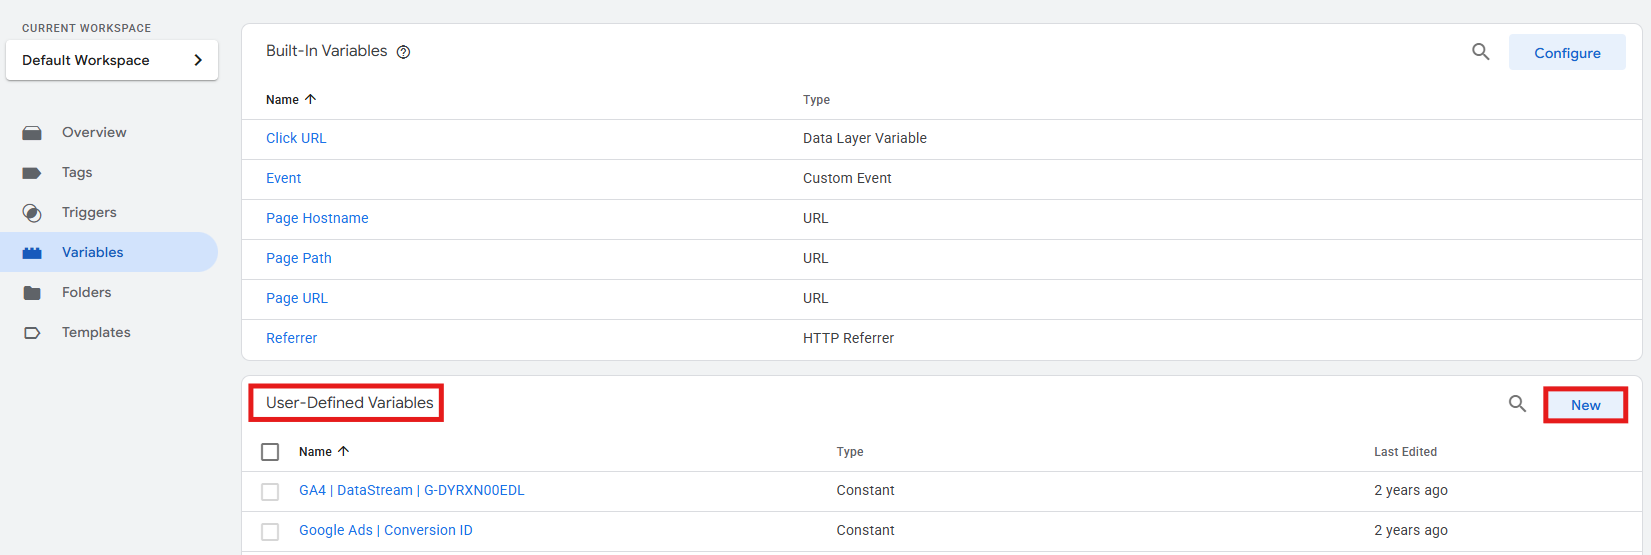
Under User-Defined Variables, click New.
-
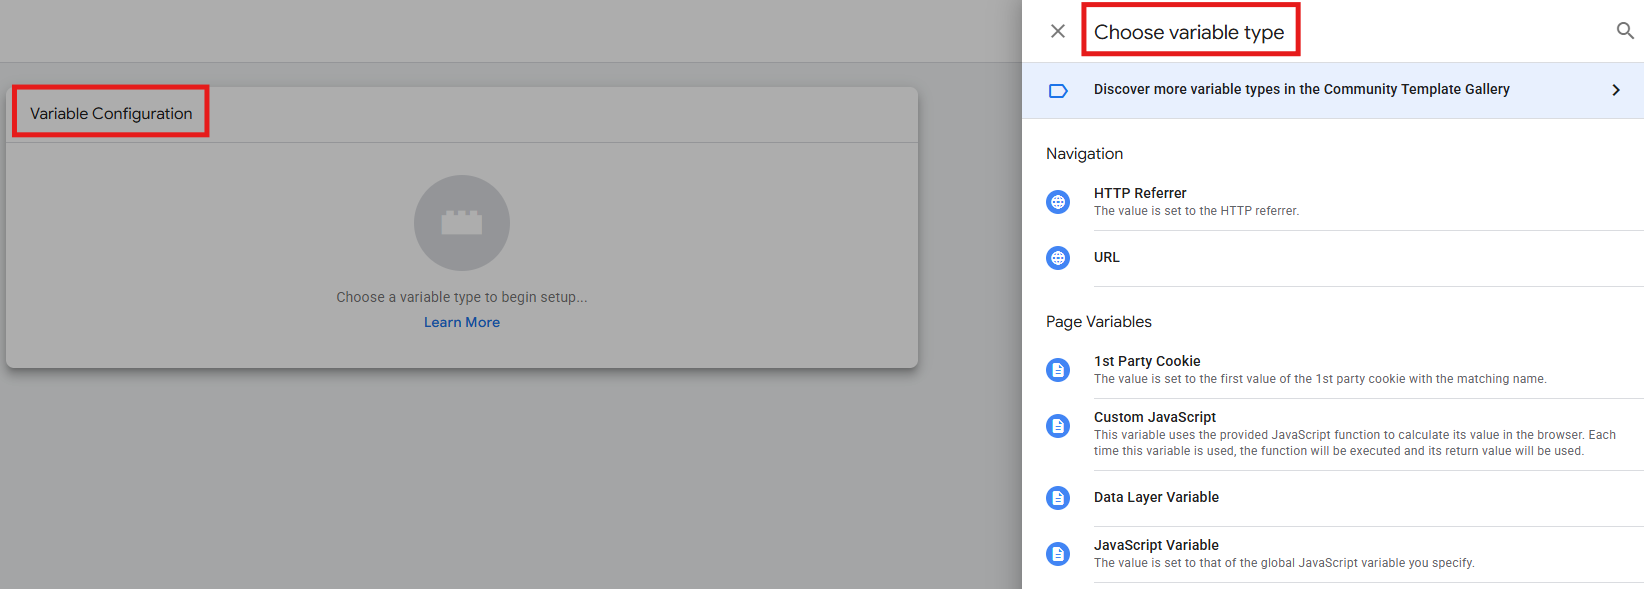
Click the Variable Configuration box and select the variable type you want to create.
-
Configure the settings specific to that type (covered in each section below).
-
Give your variable a clear name at the top of the screen.
-
Click Save.
Now, on to the user-defined types of variables.
Constant variable
This is as straightforward as it gets, and yet people don’t use it much. A constant variable holds a single, unchanging piece of information. Most of the time, people use it for their Google Analytics 4 (GA4) Measurement ID (G-XXXXXXXXXX). Instead of retyping it into each and every tag, just save it in a constant variable once and use it anywhere you need it: {{CONST - GA4 Measurement ID}}.
This is really useful, particularly when you have to make a change. For example, if you are switching to a new GA4 property, you only need to update that one variable; you won’t have to go through every single tag within your container.
How to set it up: after following the initial path explained in the previous section, select Constant as the type and fill in the Value field. That’s all there is to it.
Use a Constant for: GA4 Measurement IDs, Google Ads conversion IDs, account identifiers, or really any fixed value that appears in multiple places.
Data layer variable
Of all the different kinds of variables in GTM, this is the one you can depend on the most, and it’s the best choice to use when a web developer is helping with your tracking. Essentially, a data layer variable (DLV) grabs a piece of information that’s been added to the dataLayer array on your website – if you don’t know how the data layer is used, you should really read our article “What is the data layer in Google Tag Manager?” before continuing. To explain it quickly: your developer uses a neatly organised JavaScript object to send info from your website to Google Tag Manager.
How to set it up: choose Data Layer Variable as the variable’s type, and then type the exact key name into the Data Layer Variable Name field. You’ll need to be accurate with a few things:
- The key name is case-sensitive – for example, if your developer used “orderValue”, then “ordervalue” won’t be recognized.
- Always leave “Data Layer Version” set to Version 2. This is the right setting for all current website setups.
Keep in mind: especially with e-commerce tracking, data layers often include nested objects (objects inside of other objects). If your data layer is organized like this…
window.dataLayer.push({
  'event': 'purchase',
  'ecommerce': {
    'transaction_id': 'T-12345',
    'value': 89.99
  }
});
… to get to the “value” you’d use “ecommerce.value” as the key, and use dot notation to go into each part level the object. GTM does this for you, so all you have to do is get the key path right.
Use a DLV when: a developer has already pushed organized data to the data layer, and you want a tag or trigger to be able to use it.
When not to use it: if the value isn’t actually being sent to the data layer by a developer. In that case, the DLV will show as “undefined”. So, check with the developer that they’ve properly set up the push of that data before you try to use it.
JavaScript variable
It’s easy to mix this with the Custom JavaScript variable (we’ll explain that shortly), so let’s be very clear about what’s different. A JavaScript variable pulls the present value from an existing, global JavaScript variable on your webpage. This value is already available on the page itself because your site’s coding has defined it, and you don’t need a developer to specifically send it to the data layer.
How to set it up: choose JavaScript Variable as the variable’s type and then write the variable name.
Use a JavaScript variable when: the value is in the webpage’s JavaScript, and you’re sure it is consistently there. You can confirm this by opening your browser’s developer console and simply typing in the variable name.
When not to use it: if you aren’t positive the variable is on every page where your tag fires. If GTM looks for a JavaScript variable that isn’t there, it will say “undefined”, and that can mean your tags fire with either empty or missing parameters.
Custom JavaScript variable
A regular JavaScript variable simply holds a value, but a Custom JavaScript variable actually executes a small function and returns whatever that code produces. Because of this, you’re able to change data, apply logic, and bring together info from several sources into one output without ever touching the data layer.
How to set it up: choose Custom JavaScript as the variable type. This will bring up a code editor where you’ll type your function. You don’t have to be a developer to use this, because the format is always a function that returns something.
function() {
  return // your value here
}
Common use cases:
-
Converting a string into a proper number
Price values are frequently given to you as text inside quotation marks (so, “29.99” instead of 29.99). GA4’s e-commerce reports need real numbers, and so this function reads the price from your data layer variable and converts it. In the example below, “parseFloat” is what converts the text to a number, and ”|| 0” says to use zero as the result if the conversion fails.
function() { var price = {{DLV - product_price}}; return parseFloat(price) || 0; } -
Checking login state
If your website stores information about whether someone is logged in, you can return a clean label for GA4 with this:
function() { if (window.currentUser && window.currentUser.isLoggedIn) { return 'logged_in'; } return 'guest'; } -
Cleaning up a formatted price
function() {
  var raw = {{DLV - product_price}};
  return parseFloat(raw.replace(/[^0-9,]/g, '').replace(',', '.')) || 0;
}
Keep in mind: Custom JavaScript variables run immediately and return a result instantly. They are not suitable for operations that require waiting, like fetching data from an external service.
Use a Custom JavaScript variable when: you need to modify, calculate, or apply conditional logic to a value before it reaches your tag.
When not to use it: if the value is already clean and easily accessible through a DLV or a JavaScript variable. It’s harder to debug and makes things unnecessarily complicated.
URL variable
With a URL variable, you can extract specific parts of the current page’s URL. GTM reads the URL from the page directly, and you don’t need to use a data layer or any extra JavaScript to do that.
How to set it up: choose URL as the variable type. Then, in the Component Type dropdown, pick the specific component of the URL you want:
| Component | What it returns | Example |
|---|---|---|
| Full URL | The entire URL | https://example.com/shop?utm_source=google |
| Protocol | The scheme | https |
| Hostname | The domain | example.com |
| Port | The port number, if present | 8080 |
| Path | Everything after the domain | /shop/trainers |
| Filename Extension | The file extension | |
| Query | A specific query parameter value | google (for utm_source) |
| Fragment | The hash portion | section-2 |
Tip: if you choose Query, you’ll get an additional Query Key field. Type the parameter name there (for example, utm_source) to extract just that parameter’s value.
Practical use cases:
-
Send UTM parameters to GA4
If you’re getting UTMs from landing page URLs and sending those to GA4 as event parameters (we have a detailed article about this, called “How to track UTM parameters in Google Analytics 4”), using a URL variable to isolate the utm_campaign part of the URL is the simplest method.
-
Route data by environment
If you use the same GTM container for both your test and live sites, a URL variable that reads the hostname (the main part of the URL) can help you send information to the appropriate GA4 property using a Lookup Table (we’ll look into that later).
Use a URL variable when: you need to extract or make decisions based on any part of the current page URL.
DOM element variable
This type of variable pulls information straight from an HTML element on the webpage, specifically the element’s visible text or a particular detail (called an attribute) of that element.
How to set it up: choose DOM Element as the variable type, and then how you’re going to find the element. You can use Element ID if the element has a unique “id” attribute, or CSS Selector if you need to target it by class or position on the page). After that, type the identifier in the field that appears. If you want an attribute value rather than the text content, enter the attribute name in the Attribute Name field. Otherwise, if you simply want the text you see on the page, leave that field blank.
For instance, if a product title is within an HTML section that looks like this…
<h1 id="product-title">Running Shoes - Trail Edition</h1>
… then you’d choose ID as the selection method, type “product-title”, and leave the attribute field blank to get the text content.
You should only use a DOM element variable if you really have to. Why? Because they are easy to break. A DOM element variable will stop working if a developer changes the page layout, an ID name, or the HTML in any way, and you might not even realize your data is missing. The data layer, on the other hand, is a carefully maintained structure that won’t accidentally break.
Use a DOM element variable when: there is no data layer and no JavaScript variables available, and you need to read something that’s visibly present in the HTML.
When not to use it: if you do have a data layer or JavaScript variables, use them instead. DOM element variables should never be your default approach for new implementations.
First-party cookie variable
This type of variable gets information from a cookie that your own website has already saved on someone’s browser.
How to set it up: select 1st Party Cookie as the variable type and enter the exact cookie name in the Cookie Name field (this is case-sensitive).
Common use cases include reading a consent state stored in a cookie, retrieving a user’s login ID (which your system stores), or accessing a customer’s loyalty tier after they’ve logged in to your site.
A few things to keep in mind:
- Cookies can expire, be deleted by the user, or be blocked by the browser, so you shouldn’t depend on them for important tracking information.
- Safari and some other browsers have limits for how long first-party cookies are saved, even those from your own website.
- If the same data is also available in the data layer, a DLV is a better option (it’s more reliable and easier to fix if something goes wrong).
Use a first-party cookie variable when: you need to get a piece of information your website has put into a cookie, and you can’t get it from the data layer.
Lookup table
Instead of using code, a lookup table directly maps specific input values to specific output values. It works like this: you define input variables, then list exactly what each of those options should result in.
How to set it up: choose Lookup Table as the variable type. Then, from the Input Variable dropdown, pick the variable whose value will be looked up. Click Add Row for each input-output pair. Optionally, if you want to have something returned when nothing in the table is an exact match, you can check Set Default Value at the bottom.
For instance, if you’re running a GTM container across multiple domains and need to send data to different GA4 Measurement IDs depending on the hostname, this is how you’d do it:
| Input ({{URL - Hostname}}) | Output |
|---|---|
| shop.example.com | G-AAABBBCCC |
| blog.example.com | G-DDDEEEFFF |
| staging.example.com | G-GGGHHHJJJ |
The key limitation: lookup tables only work with exact matches. If you need to match patterns (e.g., “any URL beginning with /blog/”), you will need a RegEx table (we’ll get to those shortly).
Use a lookup table when: you need to map a small number of known, fixed values to outputs without any pattern matching.
When not to use it: if your input values aren’t fixed and predictable (for example, if they come from dynamic URLs or user-generated content). The need for a precise match would mean you’d miss almost everything, so a RegEx table is better in that case.
RegEx table
A RegEx table is similar to a lookup table, but instead of looking for exact matches, it uses regular expressions (regex) to find patterns.
How to set it up: select RegEx Table as the variable type and choose your input variable from the Input Variable dropdown (just as you would with a regular lookup table). Then, for each pattern and its corresponding result, click Add Row. Remember that patterns are checked sequentially and stop at the first match, so order matters. More specific patterns should be at the top and broader ones below.
For example, here’s how you could categorize pages by URL path:
| Pattern | Output |
|---|---|
| ^/blog/.* | Blog |
| ^/product/.* | Product |
| ^/checkout | Checkout |
| ^/thank-you | Confirmation |
Three things worth knowing, all available under Advanced Settings in the variable configuration:
- Full Matches Only (enabled by default): the pattern must match the entire input string. If you disable it, GTM returns a match if the pattern appears anywhere in the input.
- Ignore Case (enabled by default): matching will not be affected by capital or small letters, so both “/Blog/” and “/blog/” would match the same pattern.
- Capture groups and replace functionality: when enabled, you can reference parts of the matched pattern in the output using “$1”, “$2”, etc. This is great for extracting and changing specific parts of a URL or string of text.
You can also set a default output value for inputs that don’t match any of your patterns. This is useful for flagging unusual page types during testing.
Use a RegEx table when: you need pattern-based matching (for categorizing pages, grouping URL structures, or normalizing variable values at scale).
How to choose the right variable type?
We’ve looked at how well each type of variable performs in different situations. Here’s a quick summary to help you decide:
| Situation | Variable type |
|---|---|
| Static value used in multiple tags (e.g., GA4 Measurement ID) | Constant |
| Value pushed to the data layer by a developer | Data layer variable |
| Value exists in the page’s global JavaScript scope | JavaScript variable |
| Need to transform, calculate, or apply logic to a value | Custom JavaScript |
| Need part of the current URL (path, query parameter, hostname) | URL variable |
| No data layer, no global JavaScript (value only visible in the HTML) | DOM element variable |
| Value stored in a first-party cookie | First-party cookie |
| Map a fixed set of exact values to outputs | Lookup table |
| Map pattern-matched values to outputs | RegEx table |
The importance of naming conventions
Consistent variable names are incredibly important. Anyone working within your GTM container will see them, and even if you’re the only one, you might forget what a variable does after six months, if you haven’t named it clearly. A consistent naming convention instantly tells you a variable’s purpose, the source of its information, and what it returns.
A prefix system works well:
| Prefix | Variable type |
|---|---|
| CONST - | Constant |
| DLV - | Data layer variable |
| JS - | JavaScript variable |
| CJS - | Custom JavaScript |
| URL - | URL variable |
| DOM - | DOM element variable |
| LT - | Lookup table |
| RX - | RegEx table |
Now that you’re comfortable with individual variable types, there’s one more pattern worth knowing before moving on to testing.
Chaining variables
Variables can reference other variables. This allows you to build a simple sequence of changes without having to put all the processing into a single Custom JavaScript variable.
Here’s a good example: a raw price value from your data layer initially comes through as a formatted text string. Instead of handling everything in one place, you can use a chain of variables:
- A DLV
- A Custom JavaScript variable cleans it and converts it to a number (29.99).
- The tag references that Custom JavaScript variable.
Each variable does one job, and this makes debugging much easier. In GTM’s Preview mode, you can inspect the value of each variable in the chain independently, so when something is wrong, you can pinpoint exactly where the problem starts.
Testing your variables in Preview mode
No variable should go live without being tested first – actually, no change at all should. GTM’s Preview mode lets you inspect every variable’s value in real time during a debug session. Here’s how:
- Click Preview in the top-right of your workspace.
- Trigger the event you want to test, then click on it in the Tag Assistant panel on the left.
- Go to the Variables tab, where you’ll see every variable evaluated at that moment, its type, and its current value.
If a variable shows “undefined”, that usually points to one of three things: the key name doesn’t match the data layer exactly (for DLVs); the JavaScript variable doesn’t exist on that page; or the timing is off, and the data isn’t available when the variable is looking for it. The Data Layer tab in the same panel shows you exactly what’s in the data layer at different points as the page loads, which makes this kind of debugging much faster.
Tip: for more on using GTM’s debugging tools, check out our article “Preview mode: how to test and debug in Google Tag Manager”.
Final thoughts
Variables aren’t the most visible part of a GTM setup, but they’re what makes it all work, ensures your tags are accurate, your data is correct, and your container is maintainable.
If you’re unsure where to begin, start by reviewing your current container and making sure you’re using the right type of variable for each situation (the table earlier is a handy reference). If you’re starting from scratch, use data layer variables as much as possible. They’re the most dependable and easiest to troubleshoot when something goes wrong. After you have that foundation in place, the more complex techniques (lookup tables, regex tables, and chaining) become much more useful in real-world situations.